


The Ultimate Guide to Barbed Fittings: Ensuring a Leak-Free Connection with Reinforced PVC Tubing
 Leaks in pneumatic lines or fluid setups drive folks crazy. You grab good tubing like reinforced PVC. You hook it all up. Yet you still get drips or sprays. Those little issues stop production cold or ruin a whole batch. Nine times out of ten, the tubing holds up fine. The real trouble sits at the connection. A sloppy install with barbed fittings turns a solid setup into a real pain quick.
Reinforced PVC tubing stands up to decent pressure. It stays bendy too. To squeeze the best out of it, pair it with the right barbed fittings. Then install them carefully. This guide takes you through the whole thing step by step. We talk about picking the correct sizes. We cover clean cutting. We explain softening the end with heat when it helps. We show how to push it on all the way. And we check that everything sits tight with no leaks. Stick to these moves. Leaks pretty much disappear.
Why Reinforced PVC Tubing Needs the Right Barbed Fitting Connection
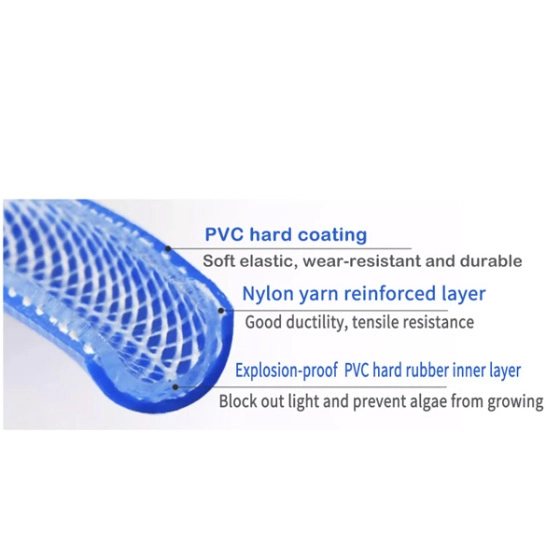
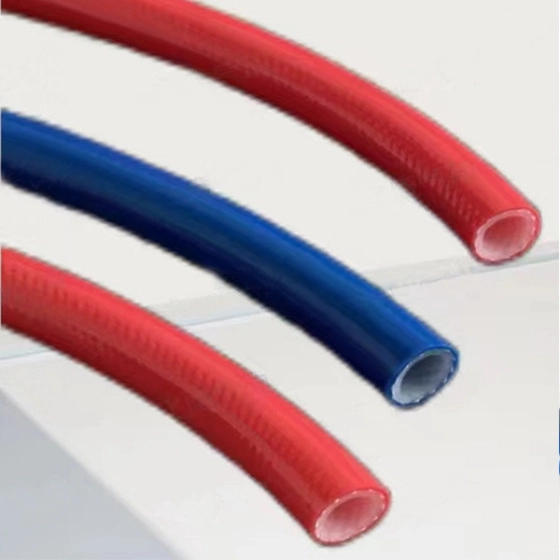
Tubos de PVC reforzados gets extra strength from polyester fibers braided right inside the PVC walls. That braid lets it handle higher pressure than regular PVC. At the same time, it keeps nice flexibility. Normal working pressure comes with a comfortable 3:1 safety margin. It even pulls a decent vacuum—up to roughly 18 inches of mercury. Temperature goes from -30°F clear up to 150°F. So it fits nicely in beverage lines, lab setups, ink delivery, or everyday low-to-medium pressure tasks.
The stuff resists chemicals pretty well. It fights off oxidation. It stays clean too. You can run most gases, fuels, oils, or mild acids through it without much worry. Hardness usually sits around 80A durometer. That means it feels soft enough to grab barbs firmly. Yet it holds its shape under pressure just fine.
Here’s the catch though. Skip a tight barb connection. Pressure pushes fluid right past the seal. Those barbs on the fitting dig into the inside wall. The tubing stretches over the ridges. Then it snaps back tight. That creates the grip. Throw on a hose clamp. Now you lock it down solid. Miss a step or pick the wrong size. You end up with slow leaks or blow-offs that catch you off guard.
Choosing the Right Barbed Fitting for Your Reinforced PVC Tubing
Size match rules everything. The barb’s outer diameter needs to line up with—or run just a hair bigger than—the tubing’s inner diameter. Reinforced PVC comes in common IDs from about 4mm to 16mm. OEM sizes shift a bit. Grab a barb built for flexible hose. Plastic or brass both work great.
Here’s a quick size cheat sheet:
-
Tubing ID 1/4″ (roughly 6mm) → grab a 1/4″ barb
-
Tubing ID 3/8″ (roughly 10mm) → grab a 3/8″ barb
-
Always test first. Push the barb in by hand. It should feel snug. Not impossible without heat.
Wrong size bites you hard. Too small and it barely grips. Too big and you risk ripping the wall or fighting to get it on. In a busy beverage setup, a mismatch lets fizz escape or invites contamination. Stay close to the spec every time.
Pick the barb style too. Straight ones work for simple runs. Elbows handle turns. Tees split lines. Steer clear of super sharp barbs on softer tubing. They can chew through over months.
Step-by-Step Installation: How to Get a Leak-Free Seal
Grab these tools ahead of time:
-
Sharp tubing cutter or fresh razor blade
-
Measuring tape or ruler
-
Hose clamps (stainless steel worm-gear style preferred)
-
Screwdriver or nut driver
-
Hot water source (or low-heat gun for tough ends)
-
Optional: soapy water for a little slip
Step 1: Cut the Tubing Square and Clean
Square cuts change the game. A crooked end never seats right over the barbs. Hold the tubing steady. Slice in one clean motion with a sharp cutter. No back-and-forth sawing. That leaves messy burrs.
Look at the fresh end. Trim off any rough spots. Wipe inside and outside with a dry rag. Even tiny dirt ruins the seal.
Real story from the field: One rushed lab install used an angled cut. Overnight drip soaked circuit boards. Fixed it with one square re-cut. Problem gone.
Step 2: Soften the Tubing End (When Needed)
Reinforced PVC stiffens up in cool shops. Dip just the end in hot water—around 140–160°F—for 10 to 30 seconds. That softens it nicely. Now it slides over barbs way easier.
Don’t boil the stuff. Too much heat warps the PVC or hurts the braid inside. Thicker walls might need closer to 20 seconds. Wipe it dry fast so it doesn’t cool off mid-push.
Some guys swear by soapy water instead of heat. It helps a bit. Hot water usually gives better stretch though.
Step 3: Slide on the Hose Clamp First
Put the clamp on the tubing before you ever touch the fitting. Slide it back a few inches. Trying to sneak it on later means pulling everything apart again. That gets old fast and risks nicks.
Step 4: Insert the Barb Fitting
Push the barb tip into the warm end. Wiggle gently. Keep steady forward pressure. Rock it side to side a touch if it fights back. Don’t twist hard—that kinks things.
Keep going until the tubing covers every single barb. You want the end to sit right up against the fitting’s shoulder or hex base. Anything less leaves weak points.
Check how deep: Most barbs need full coverage. The tubing should reach past the last barb or hit the base.
Step 5: Position and Tighten the Clamp
Slide the clamp forward. Center it over the barbed section. Tighten slowly with the screwdriver. Get it snug. Not crushed flat.
Too tight and you deform the fitting or slice into the tubing. Too loose and it slips under pressure. Tug hard after tightening. If it holds firm, you nailed it.
Stainless clamps beat out plain steel in wet spots like beverage runs. They don’t rust.
Step 6: Pressure Test the Connection
Build pressure slowly once everything’s together. Watch the joint for drips. Brush on soapy water. Bubbles mean a tiny leak. No bubbles? You’re golden.
Lots of production crews run a quick 1.5x normal pressure test for 10–15 minutes before full startup.
Common Mistakes That Cause Leaks (and How to Dodge Them)
-
Crooked cuts → uneven grip → drips. Keep every cut square.
-
No heat on stiff ends → shallow push → weak hold. Warm it up when needed.
-
Loose clamp → pull-off when pressure hits. Tug-test each one.
-
Over-tight clamp → tubing damage or squashed fitting. Snug plus a quarter turn does it.
-
Wrong barb size → poor bite or tears. Match the ID close.
-
Skipping the clamp → okay for super-low pressure. Risky anywhere else.
One plant ditched clamp-free setups. Switched to proper ones on reinforced lines. Leaks fell off a cliff—down about 90% in the first month.
Ideal Applications for Reinforced PVC Tubing with Barbed Fittings
This pairing works great where you want flex plus solid pressure handling:
-
Beverage dispensing (soda fountains, beer taps, wine lines)
-
Ink feed in large-format printers
-
Lab fluid runs
-
Ground support gear in aerospace
-
Everyday pneumatic or mild chemical transfer
Barbed fittings keep installs simple. They make service easy too—no glue, quick disconnects when you need them.
About Aisili Pneumatic
 Aisili neumático stands out as a dedicated manufacturer focused on premium polyurethane pneumatic tubing and related pneumatic materials. Since 2007, the company has built expertise in high-performance tubing solutions, operating advanced extrusion lines to deliver consistent quality and customization. With a global reach serving customers in over 30 countries, Aisili emphasizes reliable, durable products for industrial automation, robotics, and fluid handling needs. Their range includes various materials like reinforced PVC options, ensuring tailored solutions that meet real-world demands.
Conclusion
Nailing barbed fittings on reinforced PVC tubing doesn’t take rocket science. It just takes attention. Clean square cuts. Spot-on sizing. A quick warm-up when the tubing fights back. Full push-on depth. Then a firm clamp. Do those right. You wind up with joints that hold pressure tight, resist yanks, and stay bone-dry for a long haul.
Next time you rig beverage lines, lab plumbing, or any fluid setup that hates leaks, spend those extra couple minutes. The smooth runs and zero callbacks will make it worth every second.
FAQs
What makes reinforced PVC tubing a good match for barbed fittings?
Reinforced PVC tubing has that polyester braid inside. It boosts pressure strength while keeping things flexible. The 80A hardness lets it grab barbed fittings nice and tight. Clamp it right and you get a strong, leak-free seal—great for beverage runs or lab work.
How do I know if the barbed fitting sits deep enough in reinforced PVC tubing?
Push until the tubing covers all the barbs. It should butt up close to the fitting’s base or shoulder. Give it a hard tug. If it stays put, depth looks good. Shallow fits often leak when pressure kicks in.
Should I always warm up reinforced PVC tubing before sliding on barbed fittings?
Not every time. But it helps a bunch in cool rooms or with thicker walls. Dip the end in hot water for 10–30 seconds. It softens the material. Insertion gets easy. Then it shrinks back tight around the barbs as it cools.
What kind of clamp works best with barbed fittings on reinforced PVC tubing?
Stainless steel worm-gear hose clamps hold the strongest. Slide one over the barbs. Center it. Tighten snug. Don’t crank too hard—you’ll hurt the tubing or fitting. That setup lasts in wet environments too.
Why do some barbed connections on reinforced PVC tubing still leak after clamping?
Most leaks come from simple slip-ups. Crooked cuts. Wrong size barb. Not pushing deep enough. Or skipping the warm-up step. Check sizing and follow full insertion. Catch those shortcuts and leaks usually vanish.